See idler tire replacement procedure here.
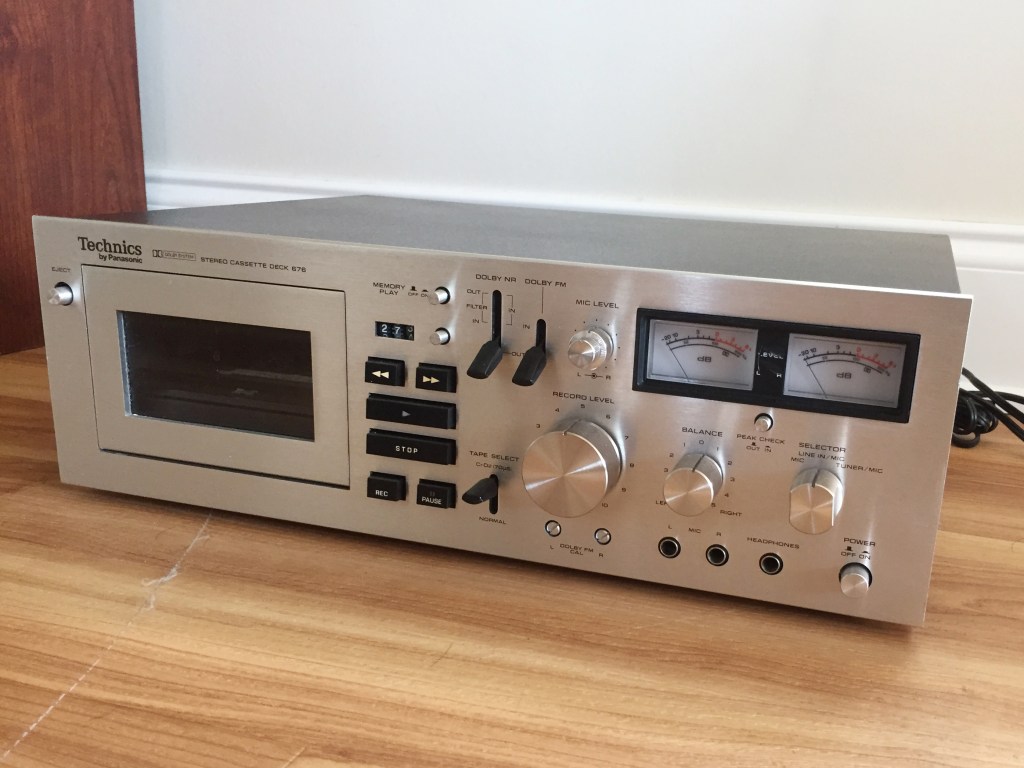
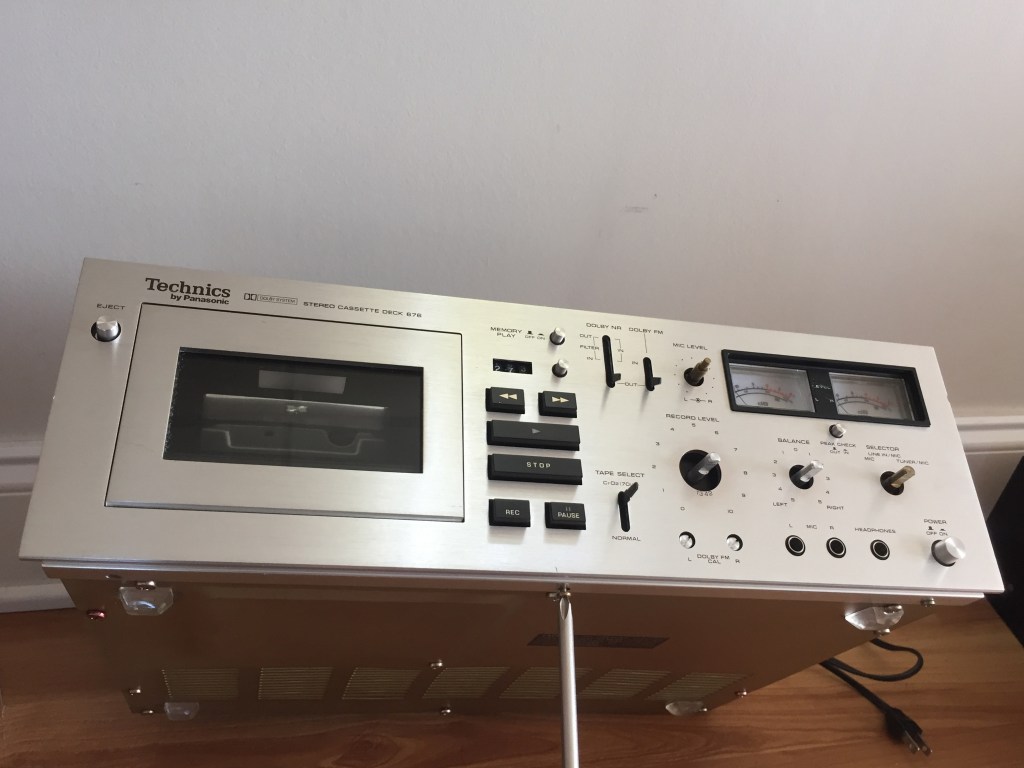
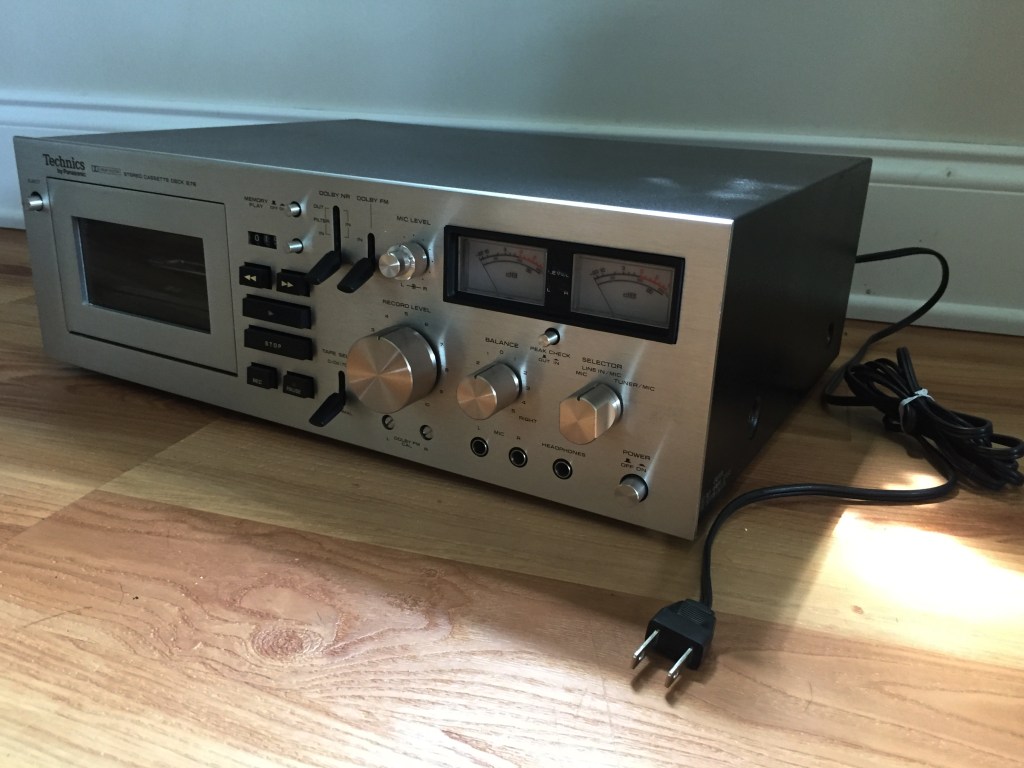
I picked up a top-of-the-line 1974 Technics tape deck two years ago and it has been an ongoing project to restore the machine to function. Apart from taking a pretty bad smack over the years which damaged the VU meters, its only major issue was that the Rec/Play switch, which is rather difficult to access, had gotten dirty over the years, rendering playback poor with blown out bass frequencies. I shelved the 676 about a year ago when I found out about its super-rare wired remote accessory, available a few times a year for $300-600 on Ebay.
A couple of weeks ago, this RP-9275A came up for auction. Against all odds, I bid $100 and….. won! While it was in the mail, I ordered some Deoxit Gold G5 contact cleaning spray. It was time to fix the 676.
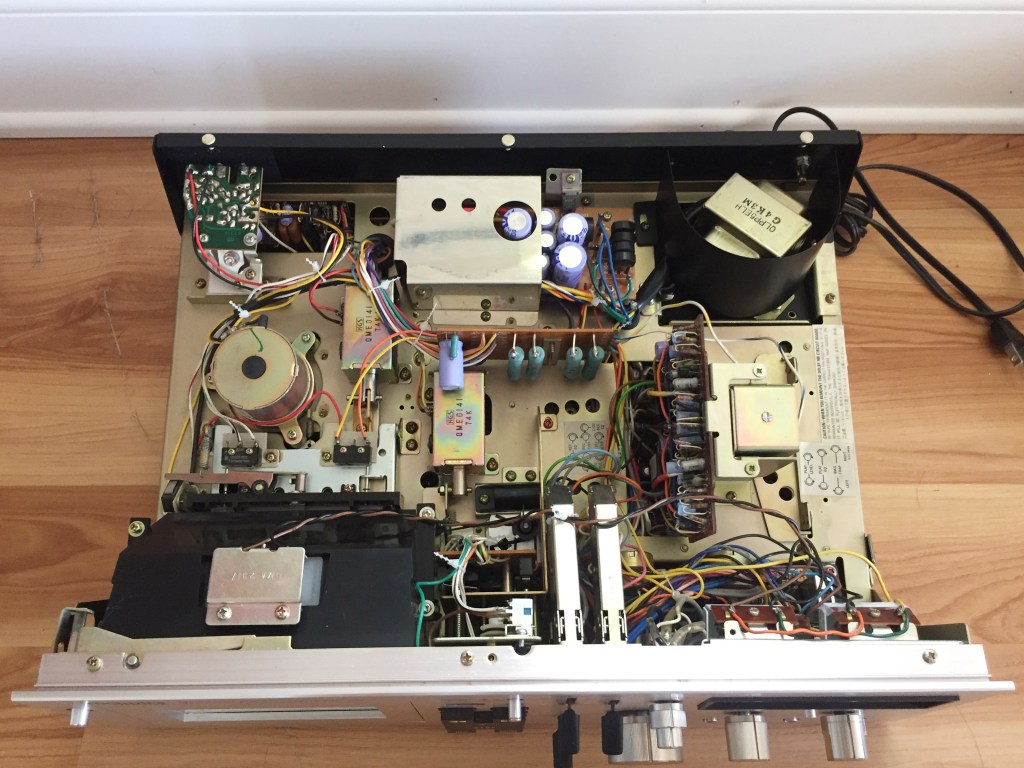
Just four screws removed from the base of the metal hood exposes the electronics, laid out as simply as any car’s engine bay of this era. The transformer features an actual bent metal heat shield (photo upper right) and the tape speed is controlled by inserting a simple flat-blade screwdriver into a control unit (photo upper left.) I do not have an oscilloscope to guage the proper setting, so I used another tape deck to record a sustained note off an mp3 file. I then put this tape, recorded at the correct speed, into the 676, and adjusted the play speed until it matched the tone of the original file played back separately and simultaneously.
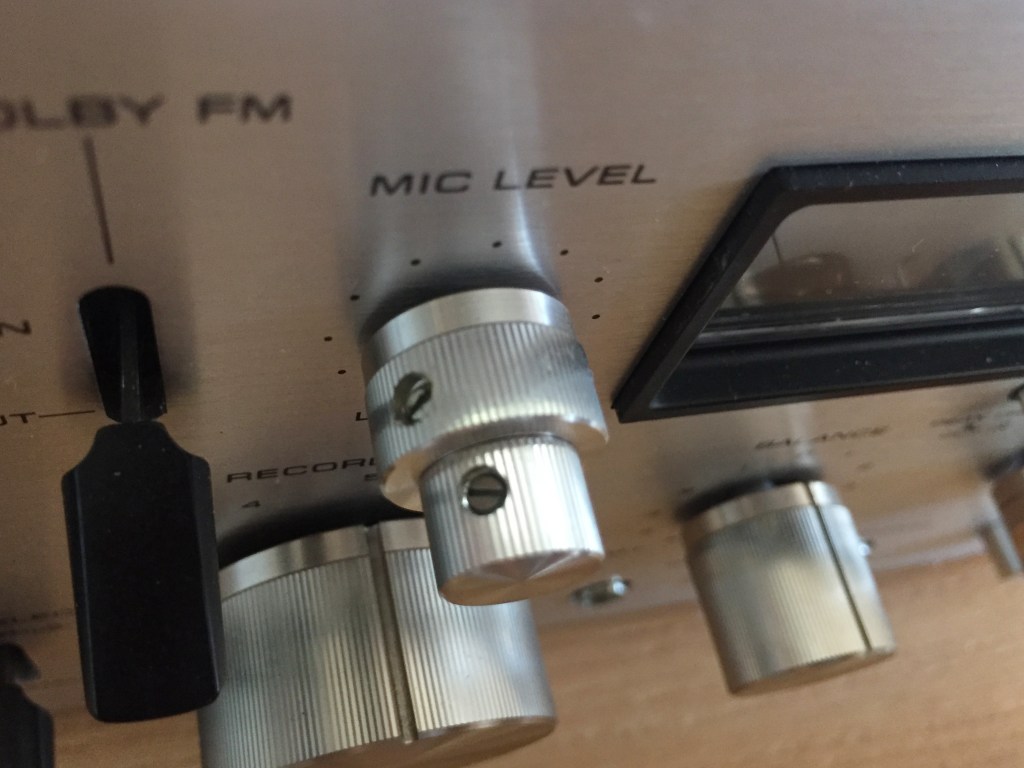
In order to remove the face plate, all knobs and switch covers must be removed. Most are unique and keyed, so this is not difficult. One exception is the Rec input volume knobs, which seat within one another (Left and Right channel controls) and are held in place with set screws.
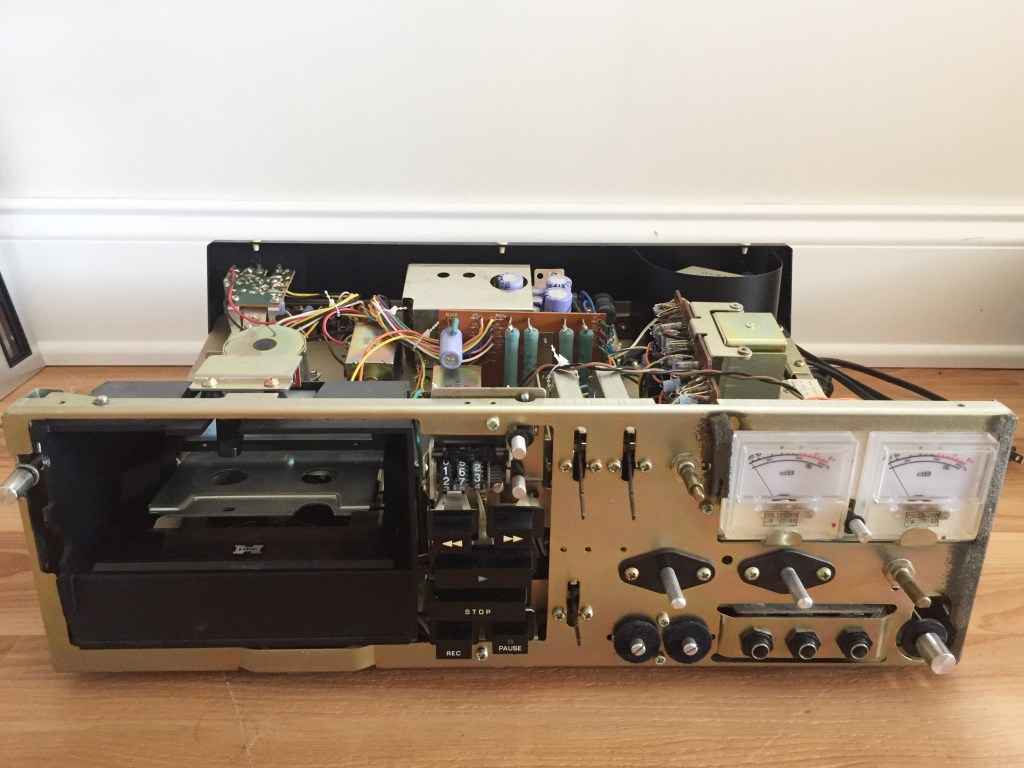
One of the most remarkable features of this vintage tape deck is its centrally located logic board, which controls various solenoids within the unit by lightly depressing buttons for rewind, fast forward, play, pause, and record. The click-clack of the solenoids snapping between their positions can be a very satisfying sound. With the bezel removed, these contacts can be easily reached and cleaned. The VU meters I replaced last year (photo upper right) help ensure that when you record, you are realizing the full potential of your tape.
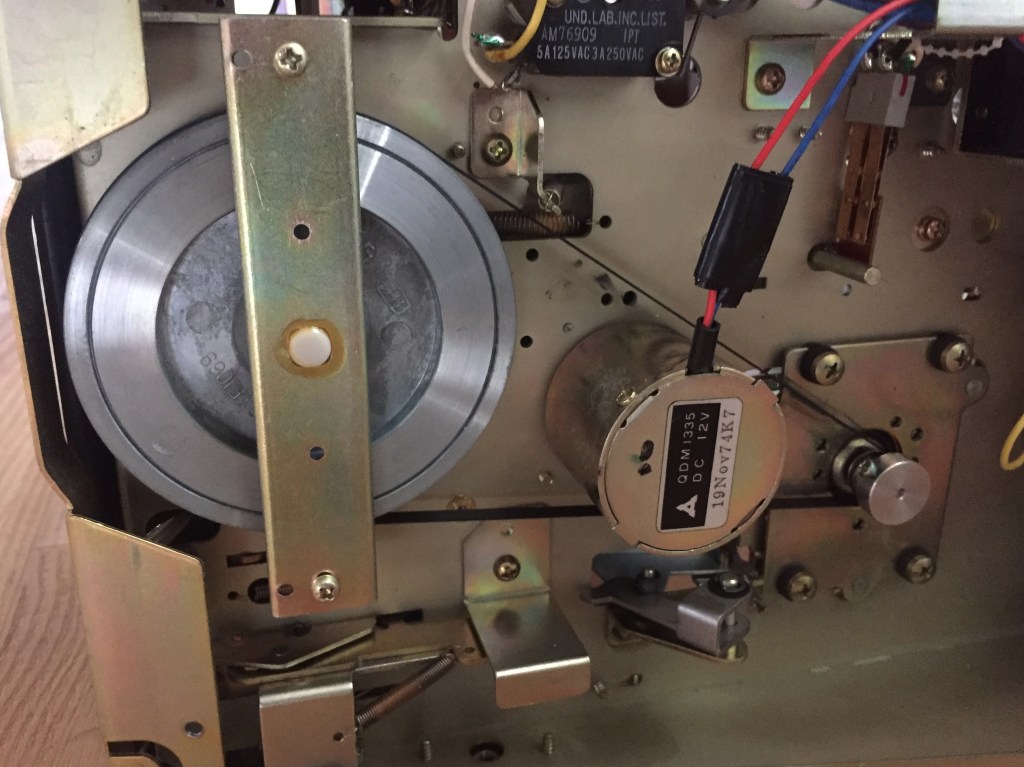
The wide drive belt and giant flywheel help to bury “wow and flutter,” irregularities in both recording and reproducing of sound. Potential energy afforded by the oversized flywheel keeps the speed consistent and sounding great. The motor on the right is held suspended away from the chassis by four screws and eight rubber grommets in order to minimize vibration. The tape spool motor, nestled between the belt, indicates a build date of November 19, 1974.
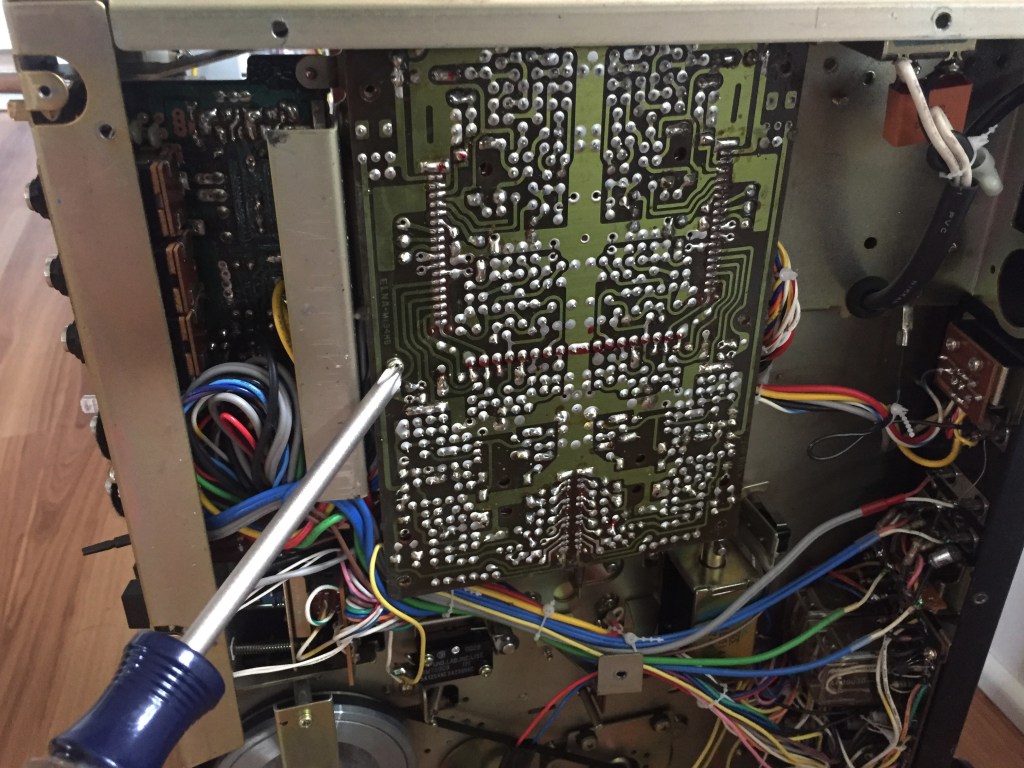
The two particular contacts I need to clean are located on the other side of this breadboard. Another board is mounted perpendicular to this one; it must be pulled up and away from the top first.
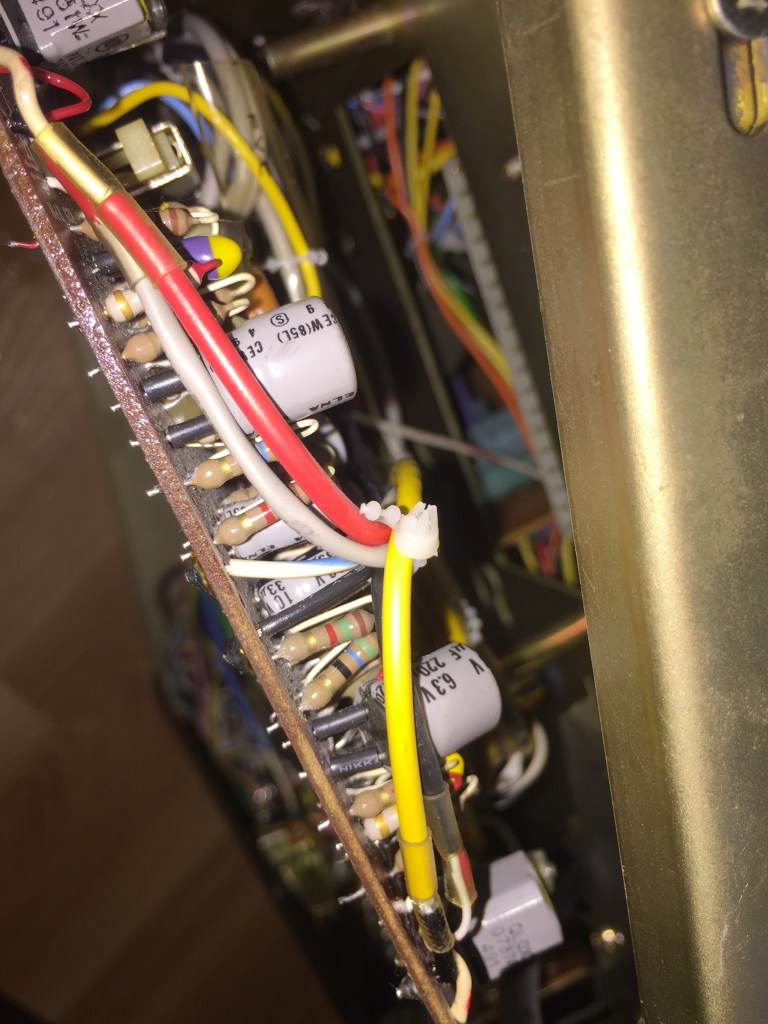
The build quality of 1970s Technics is evident in the gold band resistors (seen in tan/brown) indicating 5% tolerance. No visible band, seen in non-audio applications, indicates 20% tolerance, and a silver band, seen commonly in lesser brands, indicates 10%. Two plastic switches for “Record” and “Play” are on this board; I sprayed both generously with Deoxit then pushed on them a few times to ensure they were well cleaned.
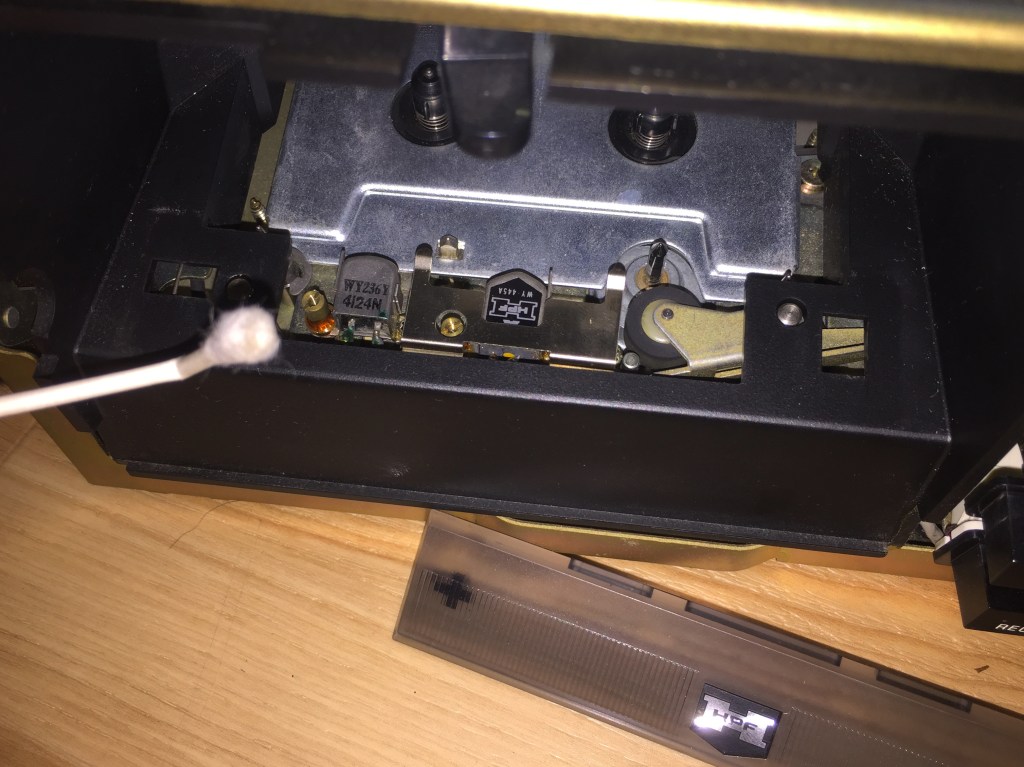
Do not use Deoxit to clean tape heads. I used 70% alcohol, but 99% is preferred. Simply rub a Q-tip on the playing and recording heads (from left to right above: Q-tip, recording head, playing head.)
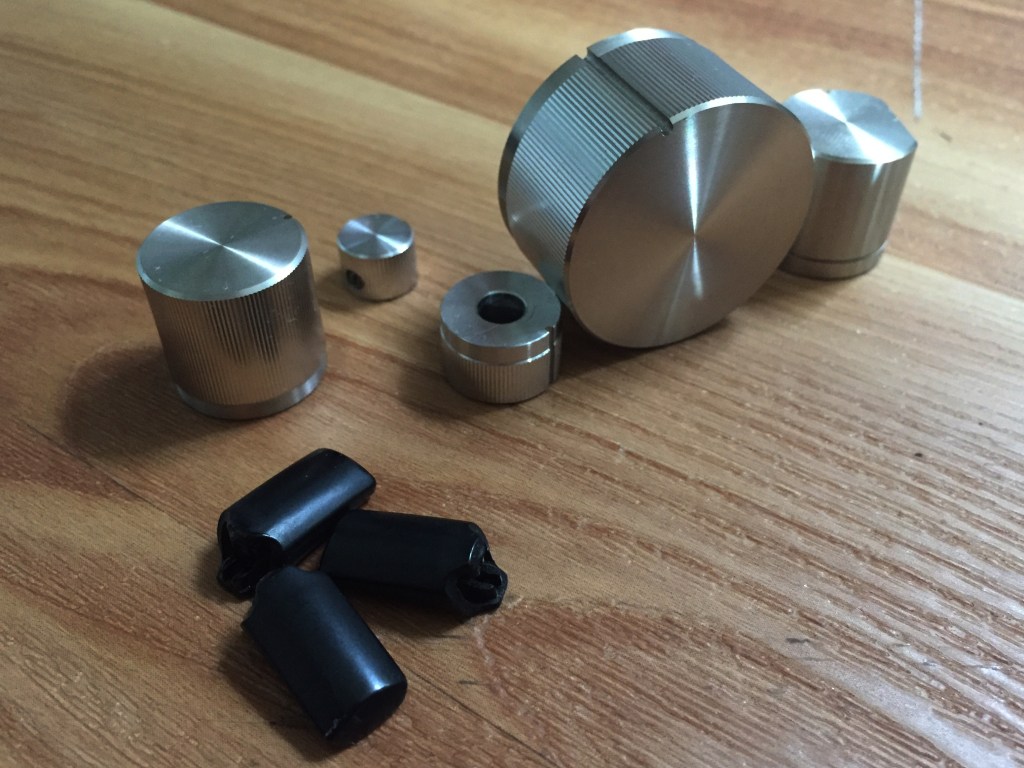
While the unit is disassembled, this is a good opportunity to align your fingernail within a damp cloth and clean the detailed surfaces of all knobs and switch covers.
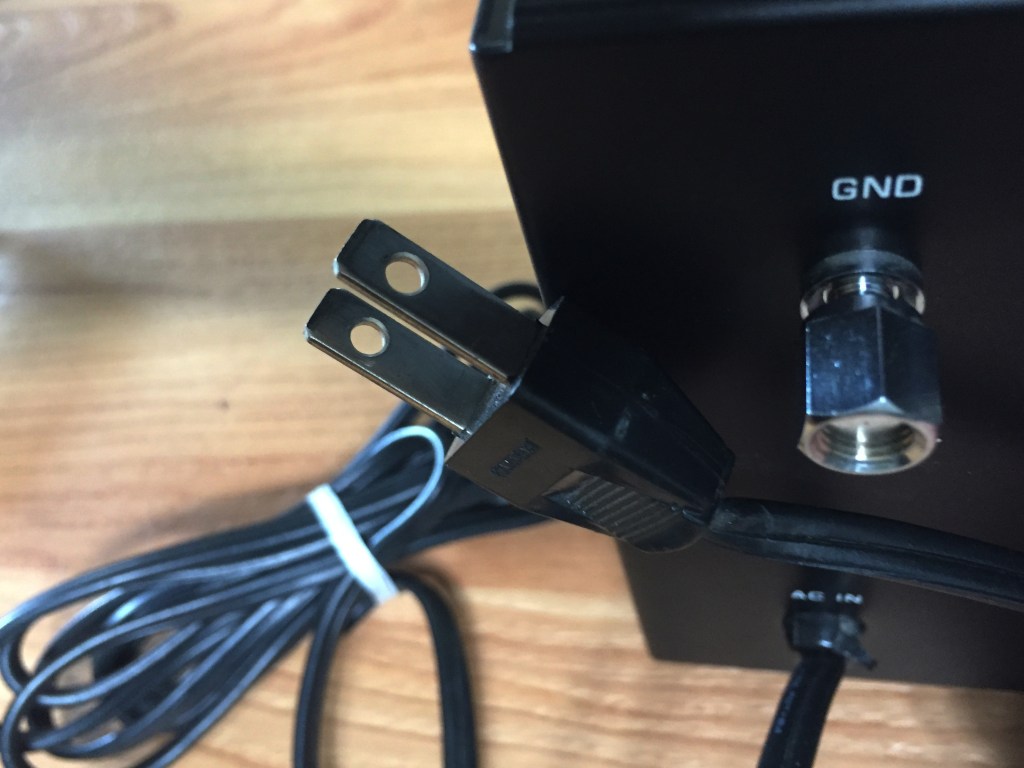
Another hallmark of vintage electronics seen here is the non-polarized two-prong electrical plug with separate ground post.
After testing the 676, I re-installed the front bezel, all knobs and switch covers, and the metal hood.

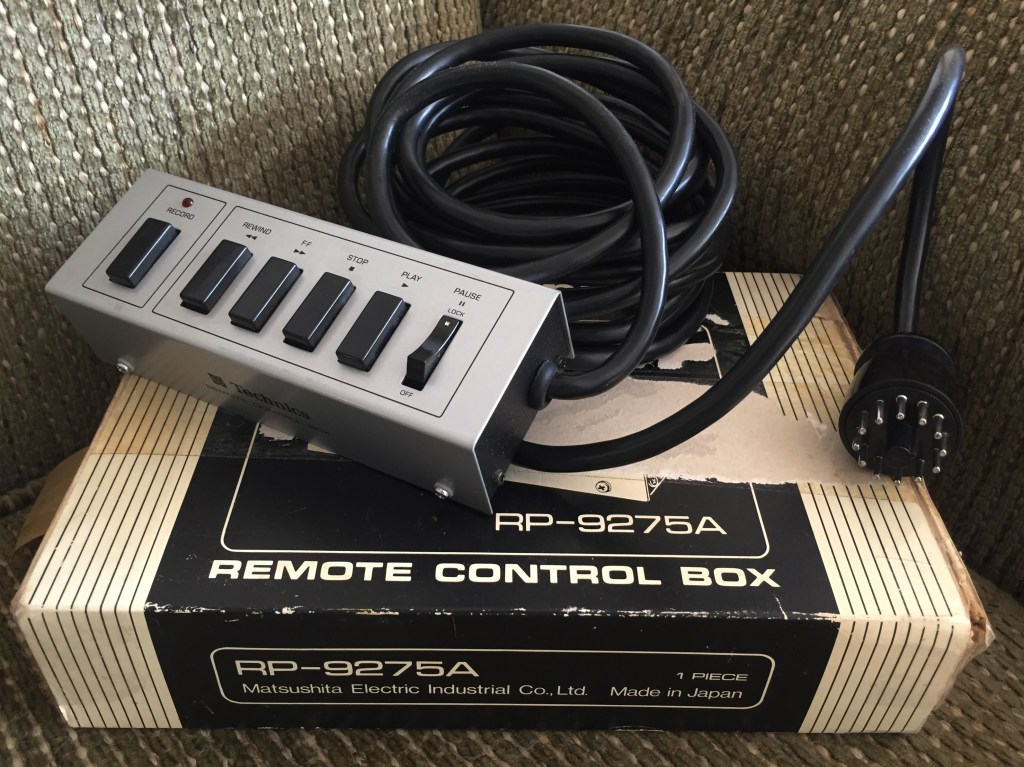
Now, the moment of truth…. The type of thing Scarface may have had sitting on the carpet next to him in the hot tub…. The wired remote.
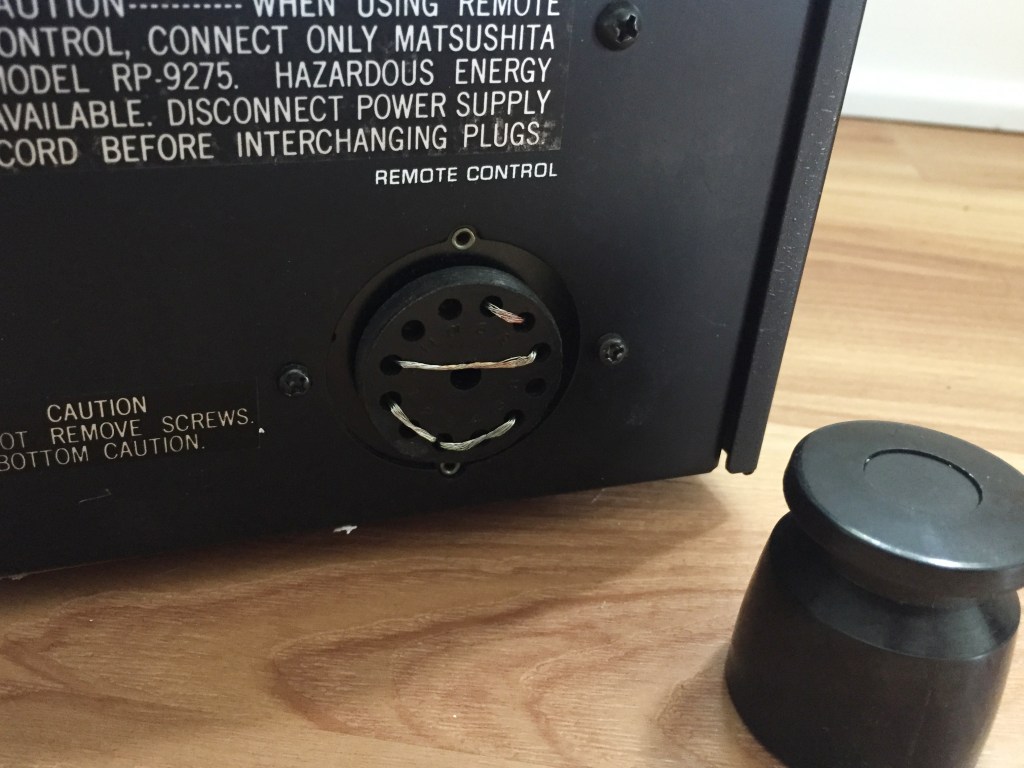
After removing the cylinder over the remote control plug-in, I found four jumper wires connecting several of the 12 holes. I was unable to pull these wires out with pliers, but I soon found out that didn’t matter.
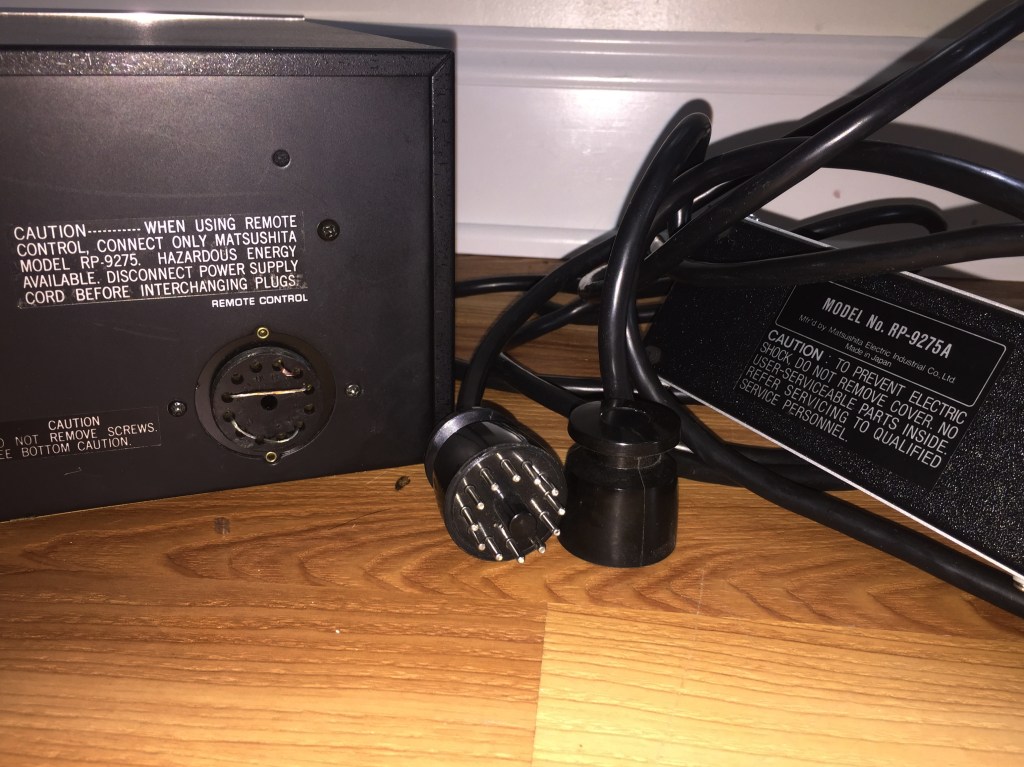
It’s somewhat difficult to discern by this photo, but the plastic cylinder in the center of the remote control’s 12 prongs is slightly larger than the receiving hole on the 676, making it impossible to insert. Note the unit’s statement: Its remote can be “only Matsushita model RP-9275” (photo left) while the underside of my remote gives itself away as an “RP-9275A.” (photo right)
This was an extremely disappointing realization because I have no idea what I’m going to do with this remote control now. The search continues for, specfically, an RP-9275.
On the bright side, the 676 is operational, working perfectly, and I’m glad to have it back on the rack.
Special thanks to Dave McDonald of 12VOLTVIDS for assistance.

Hey! I just stumbled upon your blog while doing some research on the 676. I just managed to snag one (in beautiful condition) from a thrift shop for $15 bucks earlier this week. Everything appeared to be in working order, but I ran into an issue with getting tapes to actually play. Everything else in the deck seems to be working fine, so I was stumped. Per the operation manual I found, one of the troubleshooting tips was to make the the dummy plug was completely connected to the remote control jack. And of course… no dummy plug to be found.
Out of curiosity, what does the underside/inside of the dummy plug look like? Are there pins that actually go into the remote control socket? I am having a hell of a time finding anything about them online… nor can I find a replacement plug that isn’t a part of a $120+ “parts” unit.
LikeLiked by 1 person
Hi Mitch, thanks for commenting. The dummy plug is just a threaded piece of molded plastic – It screws on the perimeter of the circular area with pin holes. So, its presence should not influence operation.
If you are having a hard time getting the tape to play, I would actually start by checking the lightbulb inside, under the number counter – That light shines through a reel to a photo sensor to let the device know the tape is still playing. When the photo sensor doesn’t see the light anymore….. AUTO STOP! So, if your light is blown out, you may just be tripping the ancient autostop function.
I suggest Dave McDonald’s teardown of his 676 (Link to his YT channel at the end of my blog post) – 45 minutes well spent!
All told, these units are worth a couple hundred in great condition, so if you’re only $15 in at this point, it might be worth scoring a nonworking donor for $50-100 with a few parts you can migrate. Maybe your current 676 would end up being the donor.
Good luck. In the end, it will be worth it!
Leon
LikeLike
I watched his video twice yesterday haha. It was super helpful! I’m pretty inexperienced with repair, so I learned a lot from there and actually talked to him in the comments a bit.
The autostop bulb over the reel is illuminated, so it’s not that. Fast forward/rewind work fine. When I hit play, the little metal part near the head goes to the tape (not sure what it’s called) and the play switch activates for about a second, before returning to the off position. That still seems like it could be an autostop issue, so I’m going to keep playing with it today
LikeLike
Yeah, based on that info I would say it’s the autostop – It’s complicated, because that means what I originally described IS what’s happening – Do you understand? Your bulb, which is not blown out, is shining on the solid part of that spindle, so the photo sensor IS reacting to not seeing the light and stopping. Why that spindle isn’t spinning….. requires more sleuthing! I am assuming that when you press PLAY, the triangle lights up and you hear the solenoid “click” on for a second then “clack” off. If you don’t hear two sharp “click-clack” sounds in succession, you have a solenoid problem (but those are probably going to be the last moving parts to break on these machines.)
That’s good that FF / REW work, that means it doesn’t have too many hours on it – if it’s moving, my guess is that your motor and capstan are OK. Replace the belts if you haven’t, they may be worn out. there’s a little group of three bands that are about 10x the size of mouth braces bands. One controls the timer counter but i d k about the other two.
That’s good that you connected with Dave, he is a great resource. I would suggest recording a 1-2 minute video of your issue for YT and post it on Audiokarma forum. (And here!)
LikeLike
I am a latecomer to this blog.
I have an RS-676US that has been stored in my loft for nearly 5 years.
It worked for several years and then stopped.
If a tape was inserted it would start and stop within a few seconds.
Fast Forward would start and stop but Reverse didn’t work at all.
All the lamps seem to be on.
I am cautious about thrashing around without knowing what am doing.
The Serial Number is RF 401712 for what that’s worth.
I have followed everything I could find on the WWW but a push in the right direction would be very welcome.
LikeLike
Hi Alan,
The wheel spinning the belt has three windows in it – A bulb shines thru these holes onto an electric eye that keeps providing power to the wheel as long as it keeps getting intermittent light – So based on your description I think your belts are old / slack and so despite the motor working your wheel with holes is failing to spin.
Don’t be afraid to take it apart, the unit and its innards are very utilitarian tough compared to newer electronics from the 80s or 90s.
Service manual, crucial reference as you restore your 676: https://ia904504.us.archive.org/7/items/manual_RS676US_SM_PANASONIC_EN/RS676US_SM_PANASONIC_EN_text.pdf
LikeLike
hi Leon I recently got one of these Cassette players and I really like it!, but nothing happens when I press the play or fast forward and rewind buttons, the rest looks good, I’ve changed all the belts, I’ve cleaned the rec/play connector, now I have no new ideas what could be wrong, I can’t hear the sound of the solenoids when I press the buttons, do you know what else I can check? b.r.Keno/Sweden
LikeLike
Hi Keno,
Congratulations on finding one! If the buttons on the logic board aren’t triggering the solenoids, I would check the connection wires off the logic board, (seems like you already cleaned the contacts,) then test the capacitors connected to the solenoids. You may also consult the service manual here: https://ia904504.us.archive.org/7/items/manual_RS676US_SM_PANASONIC_EN/RS676US_SM_PANASONIC_EN_text.pdf
The issue with FF / REW on these is that you hear the solenoid click but then it doesn’t spin, so if you can get the solenoid back, you may be lucky and get these functions back.
LikeLike
Is there a good video or set of instructions for installing the belts on this machine?
LikeLike
Michael,
The main drive belt under the machine is straightforward. For the time counter & FF/REW belts, I would suggest the 12VOLTVIDS link I mention in this post[ https://www.youtube.com/watch?v=TqozuSEMnyc ] it is pretty thorough – It’s a general tour of the innards – Around the 35 minute mark, you can extrapolate where all the belts are meant to be – I would say, use needlenose pliers to make your belts mount like the unit in that vid… If you are experiencing slow FF/REW, that problem is not with a belt, but with the cylindrical pinch rollers near the head – Hit me back if you want to discuss further!
LikeLike
I changed the counter and the idler, with a tweezers and crochet hook… it was a sewing task!… sorrowfully the ff and rew don’t work, but my 676 works smoothie
LikeLike
I have avoided doing this. My deck as of right now FF nicely but barely if at all REW. There ought to be a special tool you can use to remove and replace those difficult clips on top of the roller wheels.
I attempted to wrap heatshrink around the belts, and the outcome was not good. Fortunately I was able to return it to its previous condition. One day!
LikeLike
Hello, I received this deck today in pretty good condition. It seems clean and only seems to have one issue in that the rewind does not go all the way to the end of the tape. The fast forward on the other hand functions properly. Could this be an issue with the pinch rollers as mentioned above? Thank you
LikeLike
Michael,
I would definitely suggest inspecting the pinch rollers. They come from the factory as perfect but get eccentric with use, so the center of the cylinder wears down and there is less surface contact to pull the tape backward. If you can find an OEM replacement that’s great – If not, you could attempt using a 2- or zero-gauge heat shrink to add to the center diameter of your worn down cylinder. Good luck!
LikeLike
Hi, I restoring a RS676, cleaned the rec and play swithches, now it working, but the auto stop is activated constanstly… any body knows how to change the belts?
LikeLike
Hi Ricardo,
Check out my post, the seventh photo, see two screws holding the flywheel, remove them carefully and the belt should be free. The motor on the right controls FF/REW functions. Remove the side screw with a jeweler screwdriver, then slide the motor out. Now you are able to replace the belt and put it all back together.
LikeLike
Hi, el tape counter is stuck, algun tutorial?… thanks so much
LikeLike
The deck has three belts total. One of them spins the tape counter. Not sure what the third one does, haha. It may simply allow for an add’l sheave to make a 90 degree turn upward so the second belt can spin that counter wheel.
LikeLike
I am original owner of a rs 676 that has been idle now for some time, but I would like to begin using it again. Tape stops running about 1-2 seconds after I hit any button. It appears that the belt that runs the auto stop wheel is not moving. I believe I need to change that one belt but don’t see a resource on how to replace upper belts(flywheel belt seems fine)This is my first attempt at this type of repair, so could use some help finding replacement parts(idler tires and belts) and any access recommendations.. Greg N
LikeLike
Hi Greg,
The reason your deck intervenes and stops itself frequently is because there is a light AND a photosensor on either side of that auto-stop wheel. The wheel has holes in it, so during normal operation the photosensor “sees” that light on and off as the wheel spins. When the wheel is not spinning, that photoresistor is either seeing constant light or constant dark, that is recognized as bad operation so it deactivates the solenoid and it shuts off.
Belts and idler tires are easily enough sourced on Ebay. Idler tires for the 676 are being 3D-printed by seller “siliconemind” – I bought a set from them about 6 months ago and they are good replacements. (Nothing is as good as OEM, but I have no idea where one may source OEM parts for a 50 year old tape deck!!)
If you already have your three belts in place, they are your real-life guide as to where your replacements will go.
The more you disassemble the deck, the easier replacing these belts will be – However, if you are patient, you can maneuver a paperclip to PUSH / drape the belts where they need to be, then move the paperclip over to the other side and PULL / create tension on that belt and snap it into its pulley.
Bend out the paperclip to a straight line, then bend the very end of that paperclip into a “W” shape which will keep it low profile so you can maneuver it while also using the clip as a tool, pushing and pulling the belts without damaging the rubber.
You may also zip-tie your new belt to your old belt with the smallest zip tie you can find, then pull out the old belt while guiding the new belt into place. Carefully break the zip tie then tension the new belt with your fingertips. (I did not attempt this method because my zip ties on hand are too large, but it is potentially a solution.)
I hope this helps, please feel free to reach out or reply here if you have any other questions. You can do it!
Leon
LikeLike
no schematics on speed control module for capstand motor (M55).
LikeLike
Service manual Manual: RS676US SM PANASONIC EN
LikeLike